Back to School Square Banner Template: How to Customize Like a Designer Without Wasting Time
A well-designed square banner template can save hours of work. When you open a Back to School Square Banner Template, you expect clean layers, smart objects, and a polished result. Many people download a template like this and end up with something that looks rushed, mismatched, or simply unprofessional. The problem is rarely the template itself. More often, the breakdown happens in how the template is used, customized, or even chosen in the first place.
This article walks through the most common mistakes people make with square banner templates for Instagram and social media, and shows you how to avoid them. Whether you are a business owner posting about a fall sale, a teacher sharing classroom updates, or a freelancer designing for a client, the same principles apply. Getting the most out of a well-organized PSD file means understanding what it can do and where people typically trip up.
What Makes a Square Banner Template Worth Using
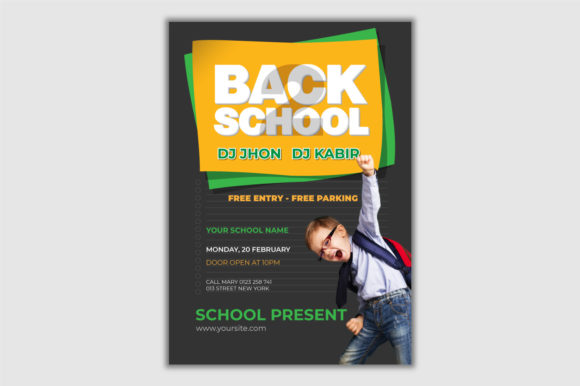
A Back to School Square Banner Template is more than just a pretty layout. At its best, it is a fully layered Adobe Photoshop file with a 1080×1080 pixel canvas, smart objects for easy image placement, and organized groups that let you swap colors, text, and graphics without breaking the design. The template described here includes these features: RGB color mode for digital display, high resolution, and compatibility with Photoshop CC. The images shown in the preview are not included, but the template directs users to free resources like Pixabay or Unsplash for replacement photos.
This kind of template appeals to a wide audience because it removes the hardest part of design: starting from a blank canvas. But even a great template can produce mediocre results if the person using it makes a few common errors. The good news is that these mistakes are entirely avoidable.
Mistake 1: Overlooking the Smart Object Workflow
The smart object is the most powerful feature in a layered template. It allows you to place an image into a designated frame, and the file automatically scales, crops, and positions it. Many users double-click the smart object thumbnail, paste in an image, and then wonder why the result looks distorted or off-center.
The issue usually comes from not understanding how the smart object handles image proportions. If you drop a portrait photo into a square template, the smart object will try to fit the entire image, leaving empty space or stretching it unnaturally. The template itself is not the problem. The mistake is not cropping or resizing the image beforehand to match the intended aspect ratio.
Better approach: Before placing any image into a smart object, crop it to a square aspect ratio or close to it. Use Photoshop's crop tool with a 1:1 constraint. This gives the smart object less work to do and ensures the image fills the frame properly. If the template uses a circular or rounded frame, the same principle applies. A little preparation before placement saves ten minutes of frustration later.
Another overlooked detail is resolution. A 1080×1080 pixel template is meant for digital display. Using a low-resolution image from a quick Google search will look pixelated when scaled up. Always source images from Unsplash, Pixabay, or your own high-resolution library. The template description mentions that images are not included, so this step is entirely in your hands.
Mistake 2: Ignoring the Layer Organization and Naming
Professional templates come with clearly named and grouped layers. You might see folders labeled "Background," "Text," "Graphics," and "Image Placeholder." Beginners sometimes skip exploring this structure and instead try to edit the template by merging layers or flattening the file early. This destroys the flexibility that makes the template valuable.
If you flatten a layered PSD, you lose the ability to change colors, swap graphics, or adjust text later. The entire point of a well-organized template is that it remains editable. Merging layers to "simplify" things actually complicates future edits. This mistake often happens under time pressure. Someone wants to make a quick change, merges a few groups, and then realizes they cannot undo the action without starting over.
Better approach: Take five minutes to open the Layers panel and click through each group. Understand what each folder controls. Look for labels like "Edit this text" or "Place your image here." If you need to make changes later, keep the file structure intact. If you need a flattened version for final export, use Save As or Export As rather than merging layers in the working file. This preserves the original template for future use.
Mistake 3: Choosing Colors That Clash With the Back to School Theme
Back to school designs typically lean into certain color palettes: warm autumn tones, rich greens, deep oranges, soft yellows, and neutral backgrounds. A common mistake is treating the template as a generic square banner and applying brand colors that have nothing to do with the season or theme. While brand consistency matters, ignoring the template's aesthetic context can make the final post feel disconnected from the intended message.
For example, using neon pink and electric blue for a back to school campaign might grab attention, but it can also feel jarring to an audience expecting classroom or seasonal imagery. The template's design already carries visual cues about the season. Fighting those cues usually results in a post that looks forced.
Better approach: Use the template's built-in color groups as a starting point. If your brand colors include a specific blue or green, test how they look against the existing background and accent colors. A small adjustment, like darkening a background shade or lightening an accent, can make the template feel cohesive with your brand without losing its seasonal identity. Photoshop's adjustment layers, like Hue/Saturation or Color Balance, let you fine-tune colors without permanently altering the original layer.
If the template uses a gradient or layered background, be careful when replacing colors. A flat color replacement might remove the depth that made the template look professional. Instead, use the existing gradient as a guide and adjust the hue rather than replacing the entire layer with a flat swatch.
Mistake 4: Using Text That Undermines the Design
Typography in a square banner template is about balance. The template likely includes placeholder text with a specific font, size, and spacing. Replacing that text with your own copy is straightforward, but many people make two errors: they use too many words, and they ignore the font hierarchy.
A square canvas at 1080×1080 pixels is not a billboard. It is a compact space designed for quick scrolling on Instagram or similar platforms. If you fill it with long paragraphs, the text becomes unreadable at thumbnail size. The template was designed with a certain word count in mind. Pushing more text into the same space forces awkward line breaks, smaller font sizes, and cluttered composition.
Better approach: Keep your headline short. Use the template's text layers as a guide for how much copy fits naturally. If your message requires more detail, consider using the Instagram caption area for the full text and let the banner act as a visual hook. For subheadings and details, maintain the size and weight hierarchy the template provides. If the template uses a bold sans-serif for the headline and a lighter weight for the subtext, follow that pattern. You can change the font to one that suits your brand, but keep the relative sizes and spacing intact.
Another typography mistake is ignoring line spacing and letter spacing. When you replace text, the default spacing in Photoshop may not match the template's original settings. Take a moment to check the Character panel and adjust tracking and leading to match the surrounding design. Small adjustments make the difference between text that looks native to the template and text that looks pasted in.
Mistake 5: Forgetting About Output and File Format
A square banner template designed for Instagram should be exported with care. The standard export format is JPEG at maximum quality or PNG if you need transparency. Some users save the file as a PSD and try to upload it directly, which does not work. Others export at too low a quality and wonder why the image looks blurry on mobile.
The RGB color mode ensures the colors appear correctly on screens. Exporting in CMYK (common for print) will dull the vibrancy. Since this template is explicitly for digital use, RGB is correct. Double-check that your export settings do not accidentally convert the file to a different mode.
Better approach: Use File > Export > Export As in Photoshop. Choose JPEG, set quality to 90% or higher, and confirm that the dimensions remain 1080×1080 pixels. If you need to include the template's design in a larger layout later, keep a copy of the PSD and export only the final version for social media. Naming your files clearly, including the date or campaign name, helps when you revisit the template months later for a new season.
Mistake 6: Downloading Without Checking System Requirements
The template specifies Adobe Photoshop CC as the minimum requirement. Some users attempt to open a layered PSD in older versions of Photoshop, in Photoshop Elements, or in free software like GIMP. While GIMP can open PSD files, it does not always handle smart objects, layer styles, or adjustment layers the same way. The result is often a flattened image or missing effects.
Better approach: If you are using Photoshop CC, you are set. If you use an older version, check whether the template was saved with compatibility for earlier releases. Many professional templates save with maximum compatibility, but features like smart objects and layer effects may not transfer perfectly to non-Adobe software. If you rely on free editors, test the template before purchasing to avoid disappointment. The template description clearly states the minimum requirement, so take that as a practical guideline rather than a suggestion.
Mistake 7: Not Saving a Master Copy
Once you customize a template for a specific post, it is tempting to overwrite the original file. This is a mistake that costs time later. Templates are reusable. If you save over the master file, you lose the original layers and have to start from scratch for the next post.
Better approach: Save the original PSD in a dedicated folder and never edit it directly. When you want to create a new post, duplicate the file and rename it with the campaign or date. This way, the template remains fresh for future use. Over the course of a school year, a single template can serve multiple announcements, event promotions, and updates. Preserving the original file makes that possible.
What to Check Before You Start Customizing
Before you open the template and begin editing, run through a short checklist. Confirm that your version of Photoshop is CC or newer. Gather your images from a source like Unsplash or your own library, and crop them to near-square dimensions. Decide on your headline and keep it concise. Review the template's layer groups so you know where everything lives. And set aside the file in a location where you will not accidentally overwrite it.
These steps take less than ten minutes but prevent the most common frustrations. The template itself is designed to save you time and deliver a professional result. The mistakes that happen along the way are almost always about how the tool is used, not about the tool itself.
A Back to School Square Banner Template, when handled with a little forethought, becomes a reliable asset. It works for announcements, sales promotions, class updates, or welcome posts. The clean layers and smart objects give you a head start. The rest comes down to thoughtful customization. Avoiding the seven mistakes covered here keeps your design looking intentional, clear, and professional, no matter how many times you reuse the template.